








Why Latte Art Etching Lines Fail on Coffee Machines
Ripple patterns need milk foam that is thin but dense. A simple heart tolerates a thicker foam as long as it still flows, but fine etched lines only form when the foam has enough fluidity. Foam that is too thick, or too thin, is the usual reason the lines refuse to appear.
Four common faults explain most failures: integrating the milk too far into the espresso, foam that is too thin, the pitcher spout touching the cup rim, and uneven swirling during the pour. Steaming technique matters too, since steam wands with more holes build a stronger vortex and take less time than single-hole wands on many home coffee machines.
Many coffee enthusiasts try latte art themselves after watching videos, only to find that they just can't get the rippled lines to come out. In fact, the problem usually lies with the milk foam—ripple patterns have extremely high demands on the thickness and density of the milk foam. Based on Front Street Coffee's hands-on experience, this article explains in detail how to steam thin yet dense milk foam suitable for ripple patterns by controlling the position of the steam wand, the steaming angle, and the air intake, and summarizes four common problems: too much integration, milk foam that is too thin, the pitcher spout touching the cup, and uneven swirling, to help you find the real reason your latte art fails.

For more specialty coffee knowledge, please follow: Front Street Coffee (Frontsteet Coffee)
Watching a barista in a latte art video give the pitcher a flick, and beautiful ripple lines spread out smoothly. When it's your turn to try, all that's left is a sigh: "Is this video lying to me?"
In fact, the reason ripple patterns won't come out is largely due to the state of the milk foam. Ripple latte art has quite strict requirements for the thickness and density of the milk foam. If you just want to make a simple "big heart," then the milk foam only needs to be dense enough, and the tolerance for thickness is relatively large—as long as it still has some fluidity.
But if you want to pour clear, fine lines, the milk foam must be steamed thin enough. Only when the milk foam is thin enough does it have enough fluidity to pour the ideal patterns.
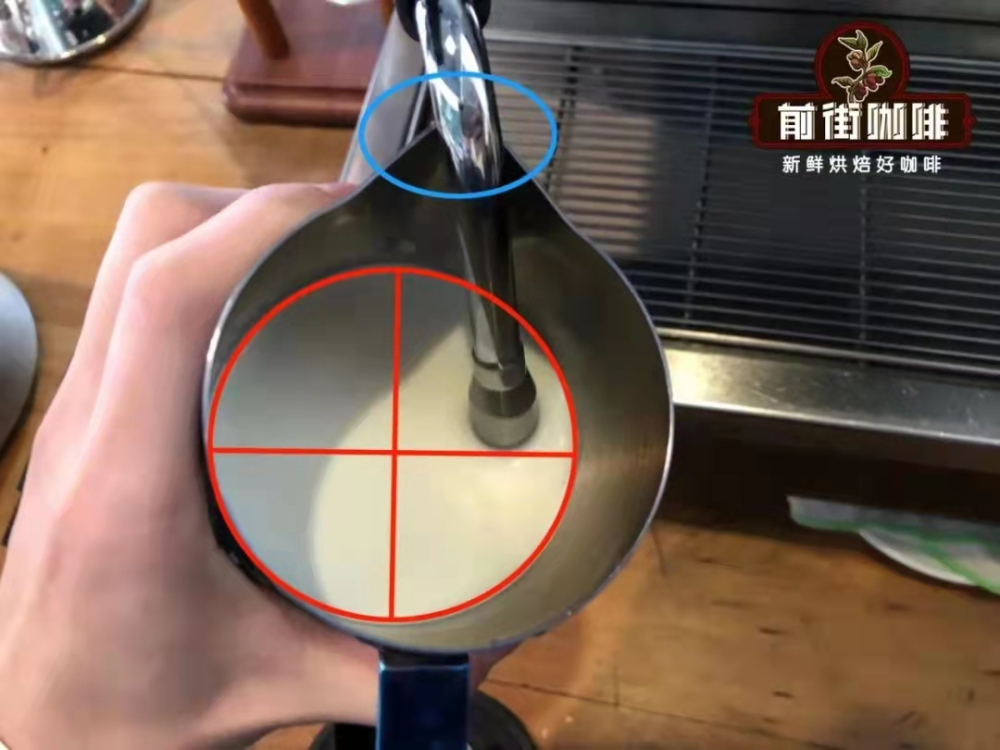
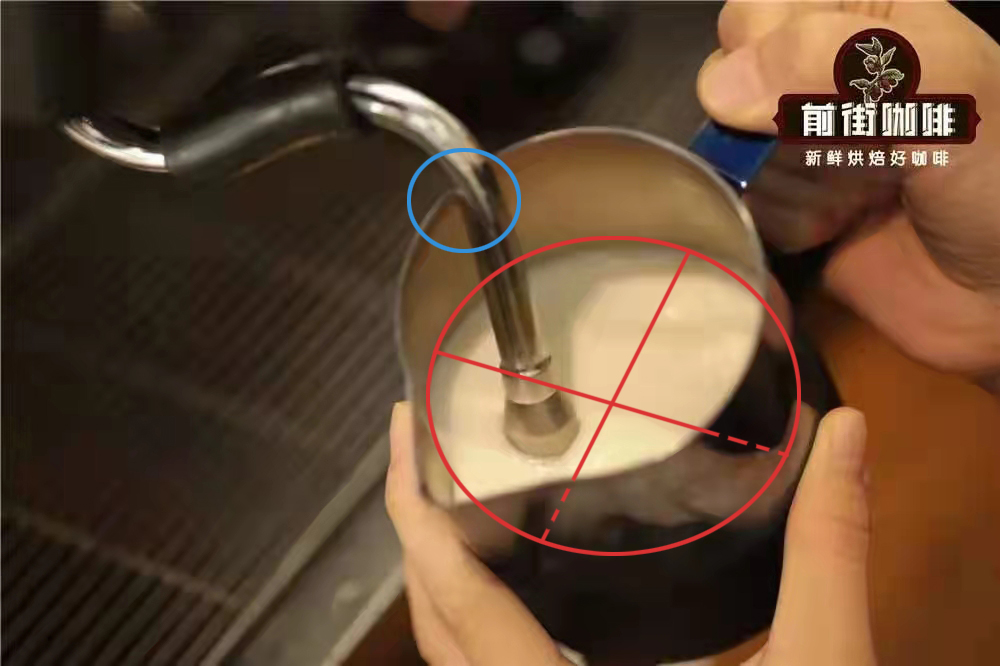
When steaming milk foam, Front Street shares a relatively stable technique: no matter whether you prefer steaming clockwise or counterclockwise, the key is to find the pivot point between the pitcher and the steam wand, and fix that pivot point. This saves a great deal of effort in maintaining the pitcher's position, and the entire steaming process becomes more stable.

The blue box is the pivot point; the red box is the guide line for the steam hole position.
The amount of foam depends on how much air is introduced. Most coffee machines today have steam wands with 3 or 4 holes, while some home models have 1 or 2 holes. Generally speaking, the more holes, the shorter the steaming time, the stronger the vortex formed, and the easier the operation; fewer holes means higher difficulty, because a longer steaming time consumes more physical effort and demands greater precision in the steaming angle.
During the steaming phase, the steam wand is generally in a half-submerged state. Taking a 4-hole wand as an example, usually 3 holes are submerged in the milk and 1 hole is exposed above the surface.
Next is controlling the steam volume, which depends on the machine's boiler configuration. Some machines have plenty of steam, while others are clearly insufficient even at maximum. With high steam volume, the milk heats up quickly and the vortex is strong; otherwise, it is weak.
Front Street's recommended method for controlling steam volume is: first set the steaming angle, then slowly open the steam valve, increasing little by little until the milk in the pitcher forms a vortex, and fix it at that steam volume. If you later feel the steam volume is too weak or too strong, make appropriate fine adjustments.
If the steam wand has sufficiently strong steam volume, it is actually easy to steam thin, dense milk foam with good fluidity. Half-submerge the steam tip, adjust the steaming angle, turn on the steam, wait for the milk to form a vortex, listen for two "chirp" sounds (the chirping indicates that air is being introduced during steaming; the longer the sound lasts, the thicker the foam), then move the pitcher slightly upward to enter the texturing phase.
In this phase, submerge all 4 steam holes into the foam layer, so there is no more "chirping" sound, while the surface continues to maintain a vortex. The main purpose is to make the milk foam smooth and dense, and incidentally heat it to 55-65 degrees.
, duration 00:11
For machines with insufficient steam, Front Street's advice is to steam and texture simultaneously. First place the steam holes at a position where they are just fully submerged in the milk, again set the angle to create a vortex, turn on the steam, and after the vortex appears, move the pitcher downward little by little—one "chirp," then texture, another "chirp," then texture again, until the desired thickness is reached.
After the milk foam is ready, the common problems that prevent ripple patterns from forming are as follows:
1. Too much integration. The more integration, the worse the fluidity of the surface, and the harder it is to pour ripple patterns. Normally, once the integration reaches 40% of the cup volume, you can start doing convection ripple patterns.
2. Milk foam too thin. Milk foam that is too thin is not something everyone can handle; the most common issue is "milk sinking to the bottom"—without enough milk foam floating on the surface, the flow punches holes in the crema on the surface.
3. Pouring too close to the surface when making ripple patterns. Some people are used to keeping the pitcher spout against the rim of the ceramic cup when pouring, which makes the resulting lines thicker. The correct approach is to raise the pitcher spout about 1 cm, or at least not let it touch the cup wall.
4. One side has more lines than the other. One possibility is that the left-right swirling amplitude of the pitcher is inconsistent; another possibility is that the posture causes the "pitcher bottom" to be tilted, shifting the direction of force for the ripple pattern, resulting in one side being large and the other small. It is best to have a friend watch your movements from the side—they may be able to point out the problem directly.
The above content is compiled by CoffeeHunters, a coffee news website.


