


How Long to Froth Milk for Latte Art?
Air intake during frothing usually takes only a few seconds for a standard latte, judged by the hiss of the steam wand rather than a timer. The steam hole sits half in the milk and half in the air, pulling in a light layer of foam, then the tip is fully submerged to spin the milk into a stable vortex until it reaches the right temperature.
Coarse foam usually comes from too much air or a weak vortex. Pitcher angle, steam hole position, and liquid surface control decide whether the foam turns dense and fluid. How do you froth milk for a latte at home? Keep the tip near the surface after the initial intake so the milk keeps rolling instead of sputtering.
Many coffee enthusiasts, when making latte art, most often encounter the problem of milk foam being coarse and not fine and smooth enough. Actually, to create ideal dense milk foam, the key lies in understanding how the steam wand works and how to create a stable vortex. This article will start from the principles of steam heating and foaming, gradually break down the core steps of air intake and texturing, and share practical techniques for completing steaming and texturing simultaneously. Front Street Coffee will also combine daily operational experience to guide you step by step in mastering key points such as pitcher angle, steam hole position, and liquid surface control, so you can easily replicate silky latte art milk foam at home.

In the circle of latte art enthusiasts, there has always been a saying: as long as the milk foam is fine enough, latte art is basically half successful. This is not unreasonable; to outline beautiful patterns on the surface of a latte, the prerequisite is that the milk foam must be smooth, dense, and have good fluidity. However, the beginning is always the hardest, and many people trying to replicate the standard milk foam from coffee shops at home get stuck right at this first step.
So, today Front Street has specially brought out a common latte art pitcher from home to guide you step by step in creating fine and smooth milk foam.

Don't rush to start; first, focus on understanding
Before the formal operation, Front Street will briefly discuss how the steam wand on an espresso machine actually works.
After opening the steam valve, high-temperature steam will spray out at high speed from the small hole at the end of the steam wand, directly hitting the surface of the milk, causing the milk to heat up rapidly—this is the heating function of the steam wand. The so-called "steaming" or "foaming" requires us to adjust the angle between the pitcher and the steam wand, using the sprayed steam to force air into the milk, which is then enveloped by the proteins in the milk to form a light layer of foam on the surface.
In actual operation, initially let the steam hole be half exposed to the air and half submerged in the milk, then decide the air intake time based on the desired foam thickness, that is, judge when to stop by the length of the "hiss~ hiss~ hiss~" sound. After the air intake is complete, fully submerge the steam hole into the milk, aiming to no longer create new bubbles while entering the next stage: texturing.

The core of texturing: creating a vortex
It should be noted that the steam sprayed from the steam hole not only brings air into the milk but also continuously cuts through the "air clusters" wrapped by proteins.
The more air wrapped by proteins, the larger the volume of foam formed, and the more prone it is to bursting. The sprayed steam can precisely use this to quickly break up those unstable large bubbles, causing them to gradually split into countless tiny bubbles. In comparison, these small bubbles are more stable and less likely to burst, and when gathered together, they form a layer of fine foam. The purpose of creating a vortex is precisely to constrain the steam from scattering and concentrate its force to eliminate large bubbles.
From experience, Front Street believes there are two tips to help everyone more easily create a vortex: first, find the correct position and angle for the steam wand to steam, and second, try to make the liquid surface formed in the pitcher as large as possible.
To successfully create a vortex, it is not only necessary to adjust the contact point between the steam wand and the milk but also to make the steam form a horizontal force. When inserting the steam wand into the milk, the entry point is best kept at the 3 o'clock or 9 o'clock direction, and then the metal tube can form an angle of about 60 degrees with the liquid surface, thus basically having a horizontal force cutting into the milk. In other words, as long as you master the angle and the position of the steam hole, you can create fine foam even without holding the pitcher.
Another key point is to use the tilt of the pitcher to obtain a larger liquid surface, mainly to make it easier to form a moving vortex. Secondly, with a certain amount of foam, the larger the liquid surface formed by the milk, the thinner the foam layer, which is more conducive to quickly cutting large bubbles into small bubbles, thereby creating a finer texture.
How to complete steaming and texturing simultaneously?
Front Street has noticed that some friends, although they have learned to create a vortex, still produce foam that is not smooth enough, and even hard or old. Why is that?
When the steaming ends and the texturing stage begins, if the steam hole is placed at the bottom of the vortex, the steam will first hit the wall of the pitcher to form an undercurrent, and the bubbles on the upper layer will not have the chance to roll down. In this way, for the milk, the vortex only serves to heat it, and the bubbles remain coarse. Therefore, after the air intake, the steam hole should be moved to the foam layer as soon as possible to truly achieve the texturing effect.
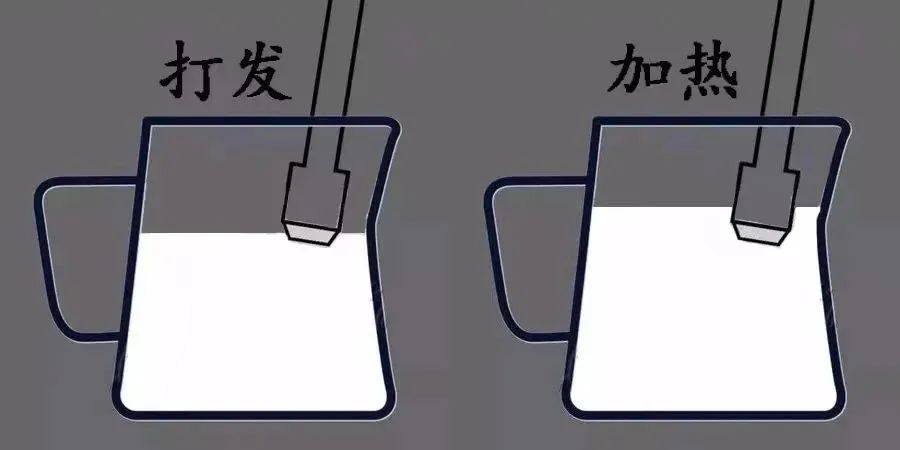
In Front Street's view, rather than dividing it into two stages, try simultaneously performing the two steps of steaming and texturing.
At the beginning, fully submerge the steam hole, then quickly adjust the angle to create a vortex, and then move the pitcher down little by little. When the pitcher is moved down, the milk surface also drops relative to the steam hole, and at this time, slightly expose the steam hole above the liquid surface to start steaming. The essence is to move gradually, which allows for more stable control of the amount of foam, and because the steam is always creating a vortex in the foam layer, the foam is in a relatively fine state from the start. After introducing an appropriate amount of air, keep the pitcher still, and you can continue texturing.
To find a stable position, we first need to master using the pitcher to lock the steam wand, forming a state convenient for pulling up and down. Front Street generally suggests using the spout of the pitcher to slowly move down along the steam wand. Everyone can practice with clean water first, and after getting a feel for it, test with milk for real.
- END - Front Street Coffee
No. 10, Bao'an Qian Street, Yandun Road, Dongshankou, Yuexiu District, Guangzhou City, Guangdong Province
The above content is compiled by CoffeeHunters, a coffee news website.


