








How to froth milk for a latte with stable, fine foam
Milk for latte art should be rich in milk fat, protein, and lactose, and fresh refrigerated milk is the practical choice. Casein micelles create surface tension on the milk surface, and steam forms bubbles of varying sizes. Moving the steam wand to create a vortex breaks the large bubbles into smaller ones, giving fine, mirror-smooth foam.
The sweetness of the foam depends on lactose content, and the ideal milk temperature sits below the point where proteins break down, so stop steaming before the pitcher gets too hot. Pair the foam with an espresso that has just the right crema, then pour the heart pattern in one steady motion. Even beginners can manage the classic heart shape.
A latte with an exquisite latte art pattern not only enhances a coffee shop's professional image but also leaves customers with a lasting impression of the brand. In fact, creating beautiful latte art at home isn't difficult—the key lies in choosing the right milk, producing fine and stable milk foam, and extracting an espresso with just the right crema. Drawing on Front Street Coffee's practical experience, this article explains in detail the types of milk suitable for latte art, milk frothing techniques, and key points for espresso extraction, then walks you through the most basic and classic heart-shaped latte art pattern step by step, making it easy even for beginners.

"Is the latte art pattern on a latte really that important?" The answer is yes. A latte with a beautifully crafted latte art pattern not only deepens customers' memory of a coffee shop but also boosts brand recognition, while also intuitively reflecting the barista's skill level.
Although latte art looks quite challenging, as long as you choose the right milk variety, produce milk foam with moderate thickness, fine texture, and good fluidity, and pair it with an espresso with just the right crema, recreating latte coffee at home is actually not as difficult as you might imagine. Next, let's follow Front Street Coffee and learn the most basic heart-shaped latte art method.
To perfectly present a latte art pattern, the following prerequisites need to be met: whether the milk foam output is stable and fine, whether the milk and espresso blend evenly, and whether the espresso is extracted just right.
Coffee latte art Which milk should be chosen?
First, milk should be chosen from varieties rich in milk fat, protein, and lactose, so that you can make a latte with rich flavor and a full, smooth mouthfeel. Front Street Coffee recommends prioritizing fresh milk that requires refrigeration.
The key to milk foam stability lies in the casein micelles and whey proteins in milk protein. The presence of casein micelles creates surface tension on the milk surface. When steam hits the surface, it forms many bubbles of varying sizes. Then, by adjusting the position of the steam wand to create a vortex in the milk, the larger bubbles are "chopped" into smaller ones, ultimately producing fine milk foam with a mirror-smooth surface.

The sweetness of milk depends on its lactose content. The ideal temperature range for frothing milk is 55 to 65 degrees Celsius, and it should not exceed 70 degrees Celsius. Within this temperature range, lactose and other sugars are most active. When the milk is frothed to this temperature range and then blended with coffee, you'll find that even without adding sugar, this milk coffee has a natural sweetness whether you smell it or drink it.
Latte coffee How should the espresso used be extracted?
After preparing suitable fresh milk, you need to use an espresso machine to extract the espresso. Whether the latte art looks beautiful depends decisively on the espresso's crema; whether the latte tastes good depends on the flavor performance of the espresso itself.
To extract an espresso with rich crema, balanced taste, and sufficient strength, Front Street Coffee recommends using fresh medium-dark roasted espresso blend beans, which lays a good foundation for latte art. Front Street currently has 4 espresso blend coffee beans on sale. Among them, the "Specialty Blend Coffee Beans," composed of 70% Brazilian beans and 30% Colombian beans, is very suitable for home or commercial scenarios. It naturally carries aromas of nuts, caramel, roasted peanuts, and cream, while easily extracting dense golden crema, offering great value for money.
The principle behind the formation of espresso crema is: the carbon dioxide in coffee beans reaches a saturated state under pressurized conditions and is forced out together with water and coffee soluble substances, forming fine golden foam. The fresher the coffee beans, the higher the internal carbon dioxide content, the thicker the espresso's crema layer, and it also affects the liquid's fluidity.
All coffee beans shipped by Front Street Coffee are dispatched within 5 days after roasting is completed. According to Front Street Coffee's practical experience, espresso extracted from espresso coffee beans within 7 to 30 days after the roast date is very suitable for making lattes in terms of both crema and flavor. Therefore, after receiving the beans, it is recommended to check the roast date on the back label before deciding when to use them.
An espresso extraction is very fast, usually completed in 25 to 30 seconds. However, because the performance of each coffee machine and grinder differs, there is no fixed parameter for espresso that can be copied directly.
Therefore, Front Street Coffee can only provide an initial reference parameter, and everyone can adjust it based on the final taste performance of the espresso: use 20 grams of grounds, at a 1:2 ratio, 9 bar pressure, and 94 degrees Celsius hot water, extract 40 grams of coffee liquid, with extraction time controlled between 25 and 30 seconds. Then judge by tasting whether the espresso meets your requirements.
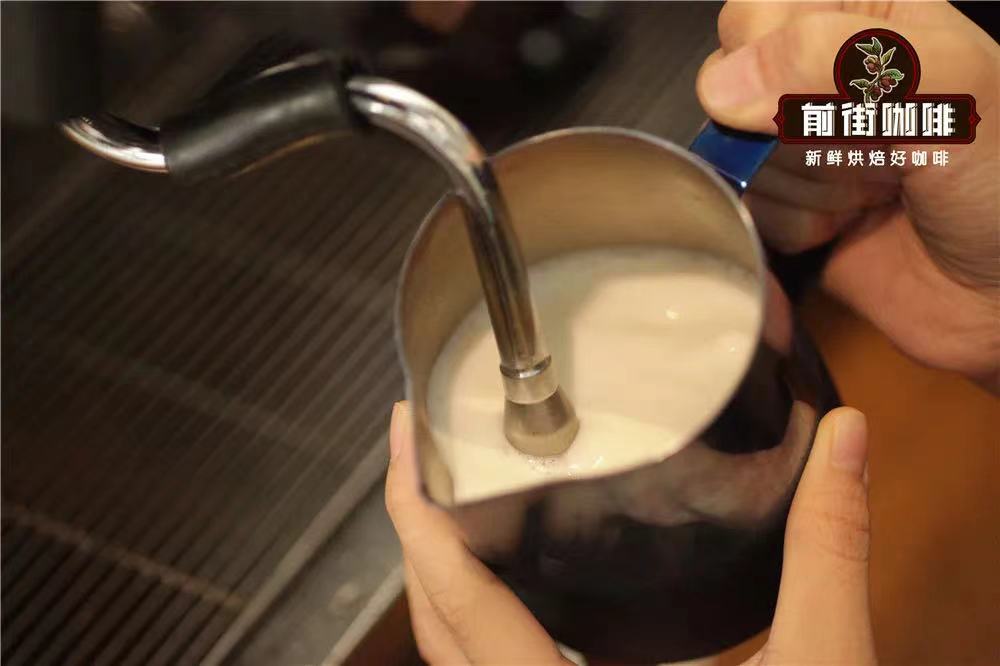
How to froth the milk foam needed for latte art?
Espresso machines are equipped with a steam wand to heat milk and produce milk foam. Before frothing milk each time, please release some steam first until no water sprays out of the wand, because milk foam made with steam containing moisture will have large bubbles.
Then tilt the milk pitcher at about a 45-degree angle (that is, toward the 2-3 o'clock or 9-10 o'clock direction), and insert the steam wand 0.8 to 1 centimeter below the liquid surface. Frothing milk at this angle allows the milk to quickly form a small vortex, and the vortex can "roll" coarser milk foam below the surface. If the steam wand is inserted too deep, the steam holes cannot contact air to form a vortex; if too shallow, the steam hitting the surface will produce rough bubbles and cause milk to splash.
The thickness of the milk foam depends on the amount of foam produced when the steam properly contacts the liquid surface. This step is what we call the aeration process. The longer the aeration time, the more foam, and the thicker the milk foam. Adjust the steam tip to 0.3 centimeters below the liquid surface, turn on the steam switch, and you will hear a "zzz—zzz" sound.
At this point it is the aeration stage. The milk foam thickness for making latte art is about 1 centimeter, so excessive aeration is not needed. After hearing the zzz sound 4 to 5 times, adjust the steam wand depth back to 0.8 to 1 centimeter, maintain a 45-degree angle to create a vortex, eliminate coarse bubbles, and heat to the appropriate temperature.
How to create a heart-shaped latte art pattern?
Prepare the espresso and pour it into a latte cup, and have ready hot milk with fine milk foam. Shake the milk pitcher at a fixed point until the milk foam surface is smooth with no separation. Then tilt the cup and pour the milk in a circular motion, fully blending with the coffee until the cup is 70% full.

Next, start the pour at a point near one quarter of the cup on the side closest to the milk pitcher, so that the entire heart shape will be located in the exact center.
To make the milk foam float on the surface of the coffee, you need to slowly straighten the cup after the fixed-point pouring. The pouring point gradually moves from the quarter position toward the center, while the left hand slowly returns the cup upright and the right hand slowly raises the pitcher spout to prepare for the finish.
The finishing move is very crucial, and many people fail at this step. When the cup is 90% full, prepare to finish. When finishing, reduce the flow, raise the pitcher spout, move along the axis to the bottom of the heart shape, and cut off the flow decisively. This will leave a short tail.
The above content is compiled by CoffeeHunters, a coffee news website.


