








How Do Frothing Temperature and Pouring Shape Latte Art?
Latte art depends on two things: fine, silky milk foam and controlled pouring. Milk is steamed by drawing air in at the surface, then texturing it into small bubbles while the pitcher heats. Once the foam is ready, the pour has two stages. The first stage is integration, with the pitcher held higher so milk sinks and mixes with the espresso; the second is pattern pouring, with the spout lowered so foam lays on the crema.
The white lines that form a heart or a rosetta come from the contrast between pale milk foam and dark crema. Foam floats because air wrapped in protein lowers its density, while the espresso and milk liquid sink. If the foam is coarse or the spout stays high during the pattern stage, the design blurs into an even brown surface instead of a clear shape.
Want to learn latte art but keep failing? Front Street Coffee explains the core essentials of milk frothing and integration for pouring patterns. From steam intake to texturing and heating, from integration techniques to pouring posture, this article systematically breaks down common problems and solutions in latte art learning. Whether you're a beginner just starting out or an advanced player hitting a plateau, you'll find practical advice here to make every cup of latte art consistently present beautiful patterns.

Every time the Front Street team welcomes new members, latte art training becomes a required step. During practice sessions, the "hiss~ hiss~" sound of steam wands fills the entire bar.
Some people grasp the essentials in just a few days and can easily pour various beautiful patterns with a bit of practice; others regress the more they practice—they could pour a heart before, but now can't even make a basic outline. The more they practice, the worse they get; the worse they get, the more anxious they become; the more anxious they become, the more they want to give up... What should they do? In Front Street's view, as a beginner who wants to learn and master latte art , identifying the root cause of failure is the first step.
Understanding the principles makes everything twice as effective
The crema on the surface of espresso and the milk foam formed when steaming milk (air wrapped by protein) float on top of the liquid due to their lower density. When the two come into contact and mix, the milk and coffee liquid sink downward while the crema and milk foam float upward. Thanks to the strong contrast between the two colors, exquisite patterns are ultimately presented.
Latte art consists of two main steps: integration and pattern pouring. When using the same pitcher of milk foam, the integration phase requires raising the pitcher spout appropriately to inject the milk—the milk foam enters the coffee by impact force, so no white traces appear on the surface. Entering the pattern-pouring stage, you need to lower the pitcher spout so the milk foam gently lays on the top layer. Combined with different pouring techniques, you can outline rich white lines.
The foundation of latte art lies in whether you can produce fine, silky milk foam
Many friends find their patterns always blur into a "mess" when doing latte art, and immediately attribute it to incorrect posture, milk separation, cup mouth too small (cup too deep), crema too stiff, etc., but overlook a fundamental prerequisite: how important it is to produce a pitcher of dense, silky milk foam.

Milk frothing is divided into two stages: air intake and texturing/heating. What the steam wand sprays out is high-temperature water vapor, which enters the milk through the steam holes to achieve heating. When the steam holes are partially exposed above the liquid surface, the water vapor must pass through air before entering the milk. At this point, the air "forced" into the milk makes a "hiss hiss" sound. Therefore, judging whether you're in the air-intake phase is by listening for this "hiss" sound. For a latte, for example, only 2–3 seconds of air intake is usually needed.
To produce foam with appropriate thickness and a smooth, fine texture, besides controlling air intake, you also need to allow sufficient time for texturing, the core of which is creating a vortex. For more details on milk frothing, everyone can review Front Street's previously shared notes, analyzing specific situations individually—we won't elaborate further here.
The integration step is truly crucial!
A well-integrated coffee will present a uniform "golden base color," with a rich, smooth taste—both beautiful and delicious. If a hot milk coffee isn't integrated properly, not only does its appearance suffer, but the taste may also be inconsistently bitter or bland, and foam separation may even occur.
Getting foamy milk to mix evenly with coffee also requires technique. Usually, hold the cup with your left hand tilted at a 45-degree angle and grip it steadily , hold the pitcher with your right hand, and depending on personal habit, keep the spout about 5–8 cm from the liquid surface. With both hands at different heights, stir in circles in the same direction, allowing the two to fully blend. As for the circling amplitude, Front Street suggests making the circles as large as possible without hitting the cup wall.
Posture should not only look good but also be correct Taking the most basic heart shape as an example, when the milk and coffee have integrated to seven-tenths full, you can lower the pitcher and begin pushing the pattern. Key points for pattern formation: when the milk foam flows onto the coffee surface, simultaneously adjust the cup's tilt angle so the milk foam enters the cup along with the liquid. In other words, no matter what pattern you're making, to make the milk foam appear on the coffee surface, you must gradually straighten the cup while pouring.
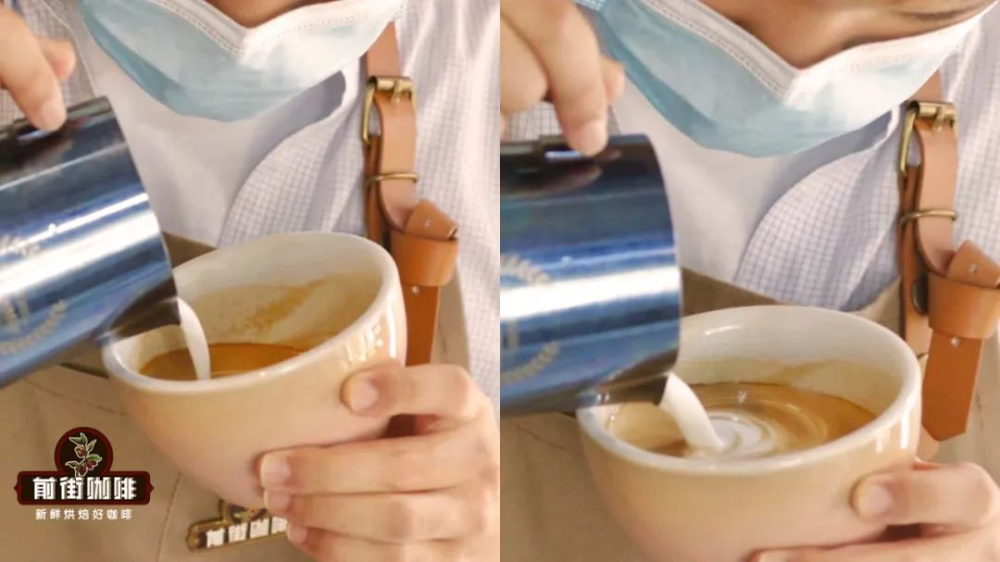
Online latte art videos at every stage are abundantly available, from big white hearts to rosettas, from rippled tulips to various animal designs—learning resources are very rich. But Front Street has noticed that some friends always fixate on high-difficulty patterns; actually, the movements of skilled baristas during latte art are more worth observing and learning from.
Pitcher grip, pouring angle, integration technique, pattern-pouring sequence, cup-returning motion, and so on. First observe carefully, then imitate, then practice repeatedly. It's best to have someone nearby help check whether your posture has issues. After all, latte art skills are muscle memory formed through long-term practice, and completing a pattern often takes only about ten seconds—sometimes it's hard to describe clearly in words.
Tips for efficient practice
Mastering latte art cannot be rushed— only through repeated practice and constant reflection, whether it's milk frothing, pitcher grip posture, or pattern-pouring technique, all will affect the final result.
If you're encountering latte art for the first time, Front Street suggests practicing with fresh milk a few times first to feel the force of the milk when steamed and the sensation of pushing out white textures as it blends with coffee. Then switch to water for practice to grasp the subtle differences in air intake, vortex, temperature, and other details. Once your hands have developed sufficient muscle memory, switch back to milk for "real combat" practice, starting with basic patterns like hearts and tulips to gradually test the results of your earlier practice.
The above content is compiled by CoffeeHunters, a coffee news website.


